Felix Krause
Co-Founder of contextsdk.com
Founder of fastlane.tools

While I leverage AI for my work, all my blog posts are handcrafted.
How to automatically manage, monitor & rollout new machine learning models across your iOS app user base
Note: This is a cross-post of the original publication on contextsdk.com.
This is the third post of our machine learning (ML) for iOS apps series. Be sure to read part 1 and part 2 first. So far we’ve received incredible positive feedback. We always read about the latest advancements in the space of Machine Learning and Artificial Intelligence, but at the same time, we mostly use external APIs that abstract out the ML aspect, without us knowing what’s happening under the hood. This blog post series helps us fully understand the basic concepts of how a model comes to be, how it’s maintained and improved, and how to leverage it in real-life applications
Introduction
One critical aspect of machine learning is to constantly improve and iterate your model. There are many reasons for that, from ongoing changes in user-behavior, other changes in your app, all the way to simply getting more data that allows your model to be more precise.
In this article we will cover:
- How to prevent data blindness
- How to remotely, continuously calibrate thresholds, and encode additional model metadata
- How to group your user-base into separate buckets, allowing you to evaluate real-life performance
- How to monitor and evaluate performance of your models
What we’ve built so far in the first 2 blog posts
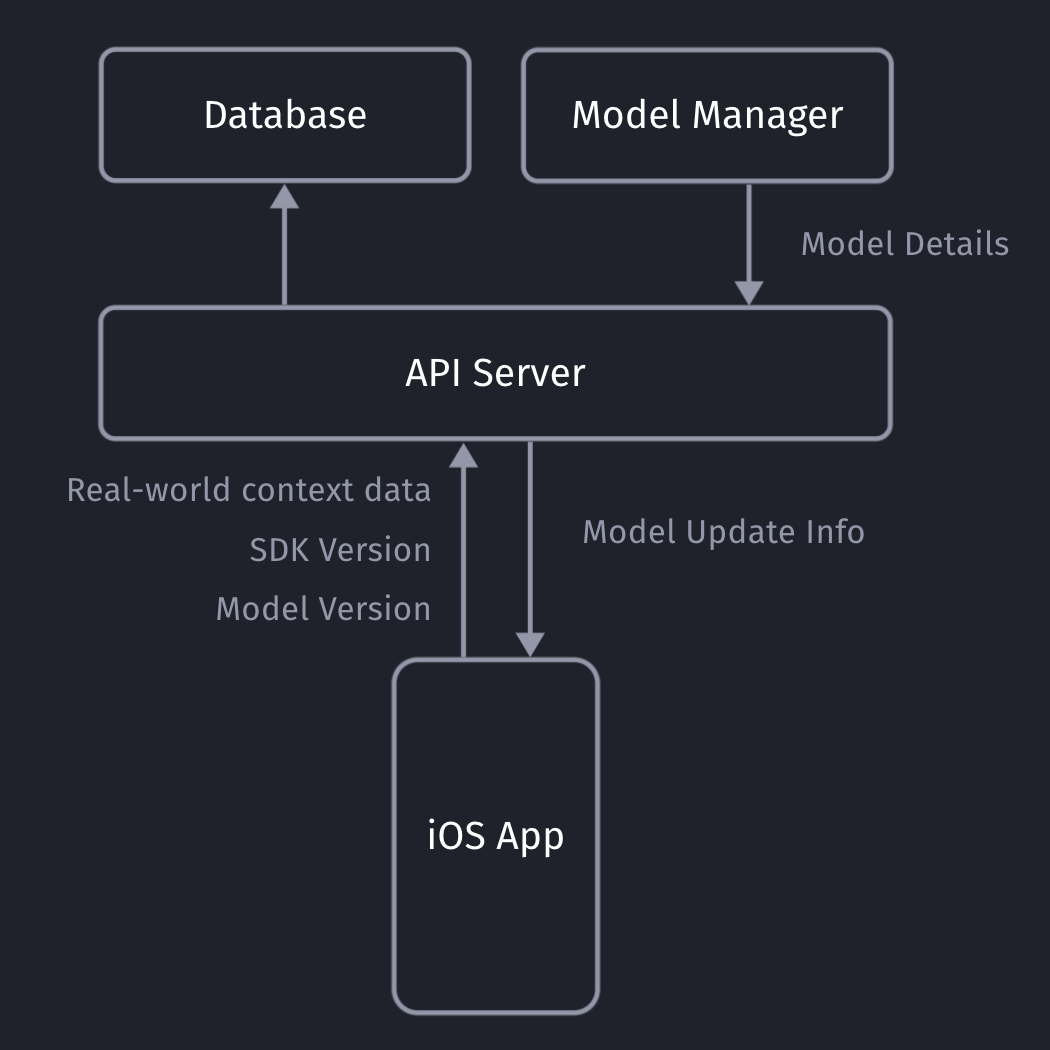
Our iOS app sends non-PII real-world context data to our API server, which will store the collected data in our database (full details here).
Our API servers respond with the latest model details so the client can decide if it needs to download an update or not.
Model Metadata Management
It’s important for you to be able to remotely calibrate & fine-tune your models and their metadata, with the random upsell chance being one of those values. Since our SDK already communicates with our API server to get the download info for the most recent ML model, we can provide those details to the client together with the download URL.
private struct SaveableCustomModelInfo: Codable {
    let modelVersion: String
    let upsellThreshold: Double
    let randomUpsellChance: Double

    let contextSDKSpecificMetadataExample: Int
}
- modelVersion: At ContextSDK, we use a UUID as a model version. For our architecture, there is no need for the client to “understand” which model version is higher than the previous one. Our API servers will handle those tasks
- upsellThreshold: Our CoreML model returns a score between 0 - 1 on how likely the user is to convert in the current moment. Depending on our customer’s preference and project goals, we can use this value to decide on the “Prompt Intensity Level”
- randomUpsellChance: That’s the value we described above to help us prevent data blind spots. As we monitor our incoming data, we can remotely change this value to fit our current requirements
- Other model metadata: We use this to include more details on what exact type of data the model requires as inputs
Model Inputs
At ContextSDK, we generate and use more than 180 on-device signals to evaluate how good a moment is to show a certain type of content. With machine learning for this use-case, you don’t want a model to have 180 inputs, as training such a model would require enormous amounts of data, as the training classifier wouldn’t know which columns to start with. Without going into too much Data Science details, you’d want the ratio between columns (inputs) and rows (data entries) to meet certain requirements.
Hence, we have multiple levels of data processing and preparations when training our Machine Learning model. One step is responsible for finding the context signals that contribute the highest amount of weight in the model, and focus on those. The signals used vary heavily depending on the app.
It was easy to dynamically pass in the signals that are used by a given model in our architecture. We’ve published a blog post on how our stack enforces matching signals across all our components.
For simple models, you can use the pre-generated Swift classes for your model. Apple recommends using the MLFeatureProvider for more complicated cases, like when your data is collected asynchronously, to reduce the amounts of data you’d need to copy, or for other more complicated data sources.
func featureValue(for featureName: String) -> MLFeatureValue? {
    // Fetch your value here based on the `featureName`
    stringValue = self.signalsManager.signal(byString: featureName) // Simplified example
    return MLFeatureValue(string: stringValue.string())
}
We won’t go into full detail on how we implemented the mapping of the various different types. We’ve created a subclass of MLFeatureProvider and implemented the featureValue method to dynamically get the right values for each input.
As part of the MLFeatureProvider subclass, you need to provide a list of all featureNames. You can easily query the required parameters for a given CoreML file using the following code:
featureNames = Set(mlModel.modelDescription.inputDescriptionsByName.map({$0.value.name}))
Grouping your user-base
Most of us have used AB tests with different cohorts, so you’re most likely already familiar with this concept. We wanted something basic, with little complexity, that works on-device, and doesn’t rely on any external infrastructure to assign the cohort.
For that, we created ControlGrouper, a class that takes in any type of identifier that we only use locally to assign a control group:
import CommonCrypto

class ControlGrouper {
    /***
        The groups are defined as ranges between the upperBoundInclusive of groups.
        The first group will go from 0 to upperBoundInclusive[0]
        The next group from upperBoundInclusive[0] to upperBoundInclusive[1]
        The last group will be returned if no other group matches, though for clarity the upperBoundInclusive should be set to 0.
        If there is only 1 group regardless of specified bounds it is always used. Any upperBoundInclusive higher than 1 acts just like 1.
        Groups will be automatically sorted so do not need to be passed in in the correct order.

        An arbitrary number of groups can be supplied and given the same userIdentifier and modelName the same assignment will always be made.
     */
    class func getGroupAssignment<T>(userIdentifier: String, modelName: String, groups: [ControlGroup<T>]) -> T  {
        if (groups.count <= 1) {
            return groups[0].value
        }

        // We create a string we can hash using all components that should affect the result the group assignment.
        let assignmentString = "\(userIdentifier)\(modelName)".data(using: String.Encoding.utf8)

        // Using SHA256 we can map the arbitrary assignment string on to a 256bit space and due to the nature of hashing:
        // The distribution of input string will be even across this space.
        // Any tiny change in the assignment string will be massive difference in the output.
        var digest = [UInt8](repeating: 0, count: Int(CC_SHA256_DIGEST_LENGTH))
        if let value = (assignmentString as? NSData) {
            CC_SHA256(value.bytes, CC_LONG(value.count), &digest)
        }

        // We slice off the first few bytes and map them to an integer, then we can check from 0-1 where this integer lies in the range of all possible buckets.
        if let bucket = UInt32(data: Data(digest).subdata(in: 0..<4)) {
            let position = Double(bucket) / Double(UInt32.max)

            // Finally knowing the position of the installation in our distribution we can assign a group based on the requested groups by the caller.
            // We sort here in case the caller does not provide the groups from lowest to higest.
            let sortedGroups = groups.sorted(by: {$0.upperBoundInclusive < $1.upperBoundInclusive})
            for group in sortedGroups {
                if (position <= group.upperBoundInclusive) {
                    return group.value
                }
            }
        }

        // If no group matches, we use the last one as we can just imagine its upperBoundInclusive extending to the end.
        return groups[groups.count - 1].value
    }
}

struct ControlGroup<T> {
    let value: T
    let upperBoundInclusive: Double
}
For example, this allows us to split the user-base into 3 equally sized groups, one of which being the control group.

What’s data blindness?
Depending on what you use the model for, it is easy to end up in some type of data blindness once you start using your model.
For example, let’s say your model decides it’s a really bad time to show a certain type of prompt if the battery is below 7%. While this may be statistically correct based on real-data, this would mean you’re not showing any prompts for those cases (< 7% battery level) any more.
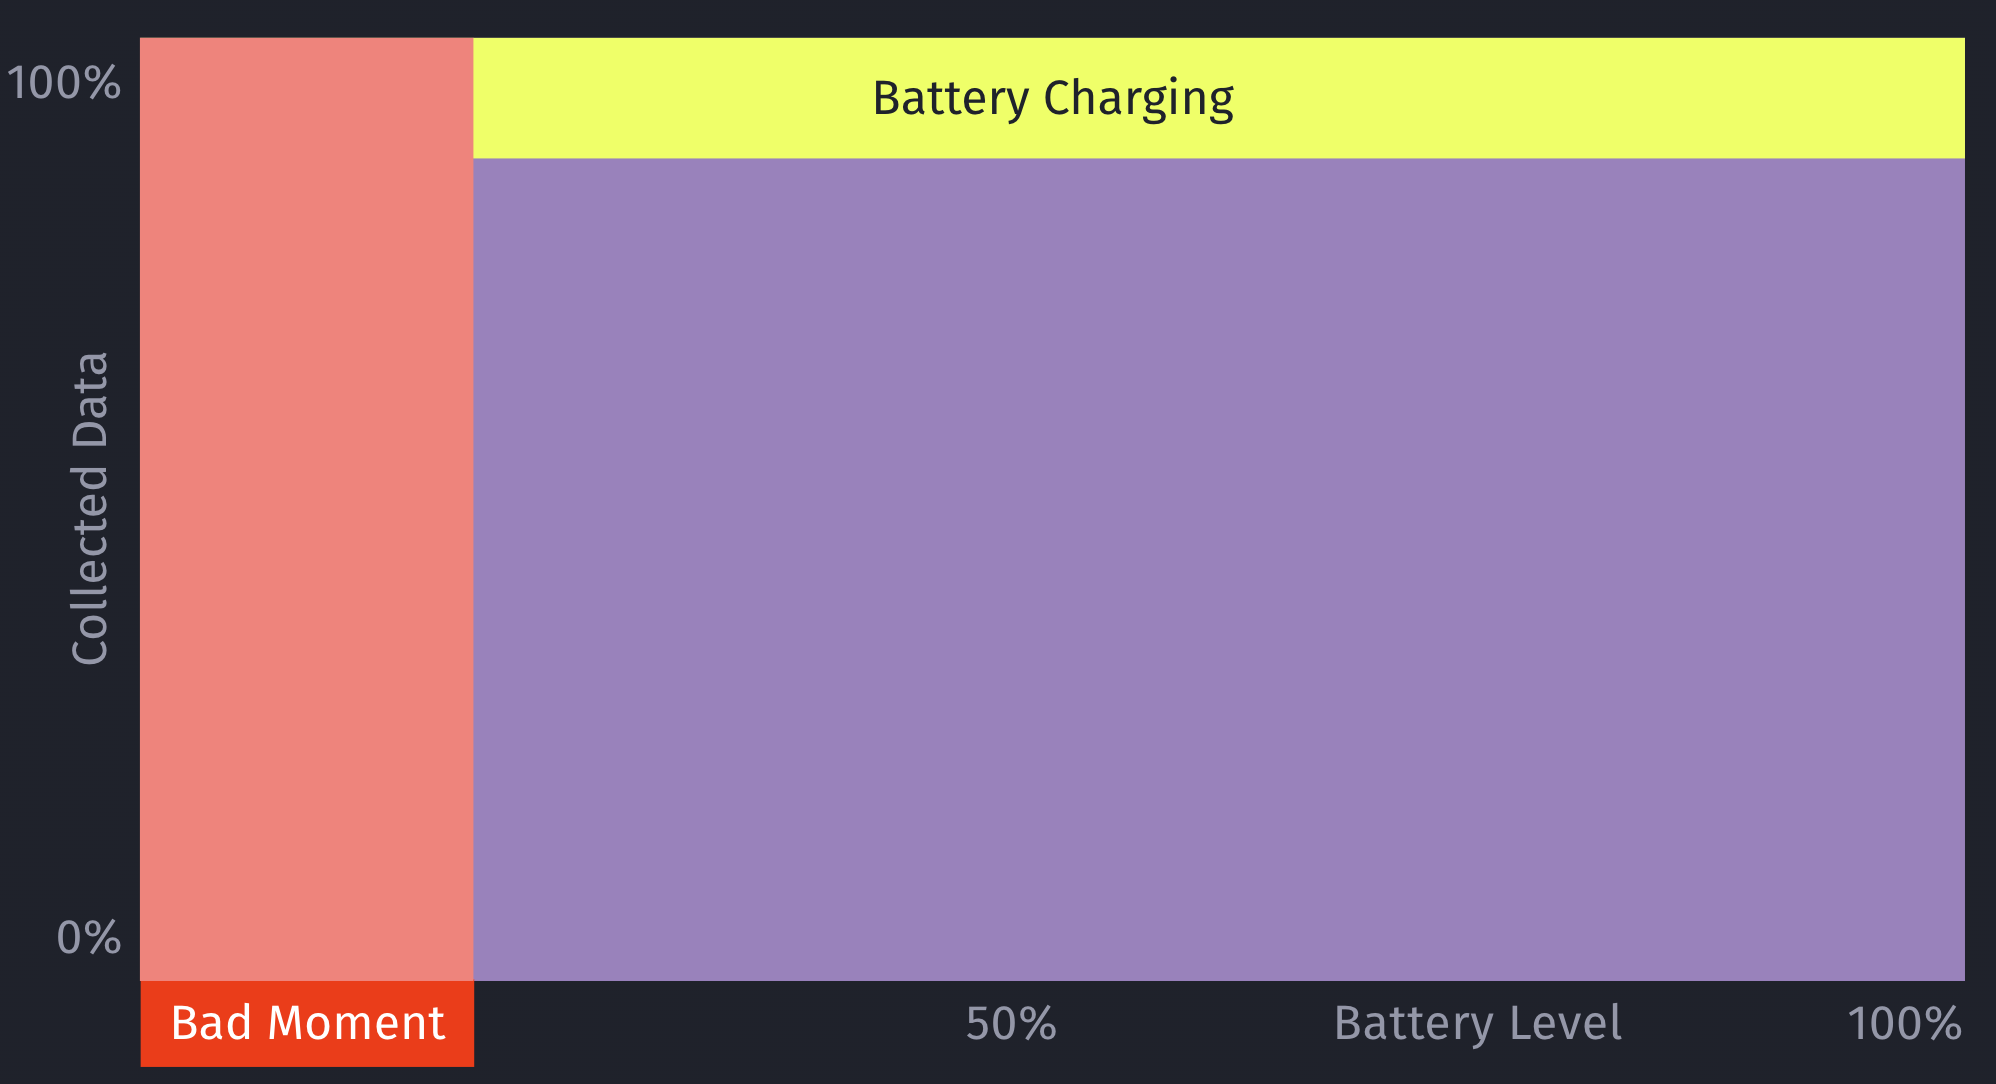
However, what if there are certain exceptions for those cases, that you’ll only learn about once you’ve collected more data? For example, maybe that <7% battery level rule doesn’t apply, if the phone is currently plugged in?
This is an important issue to consider when working with machine learning: Once you start making decisions based on your model, you’ll create blind-spots in your learning data.
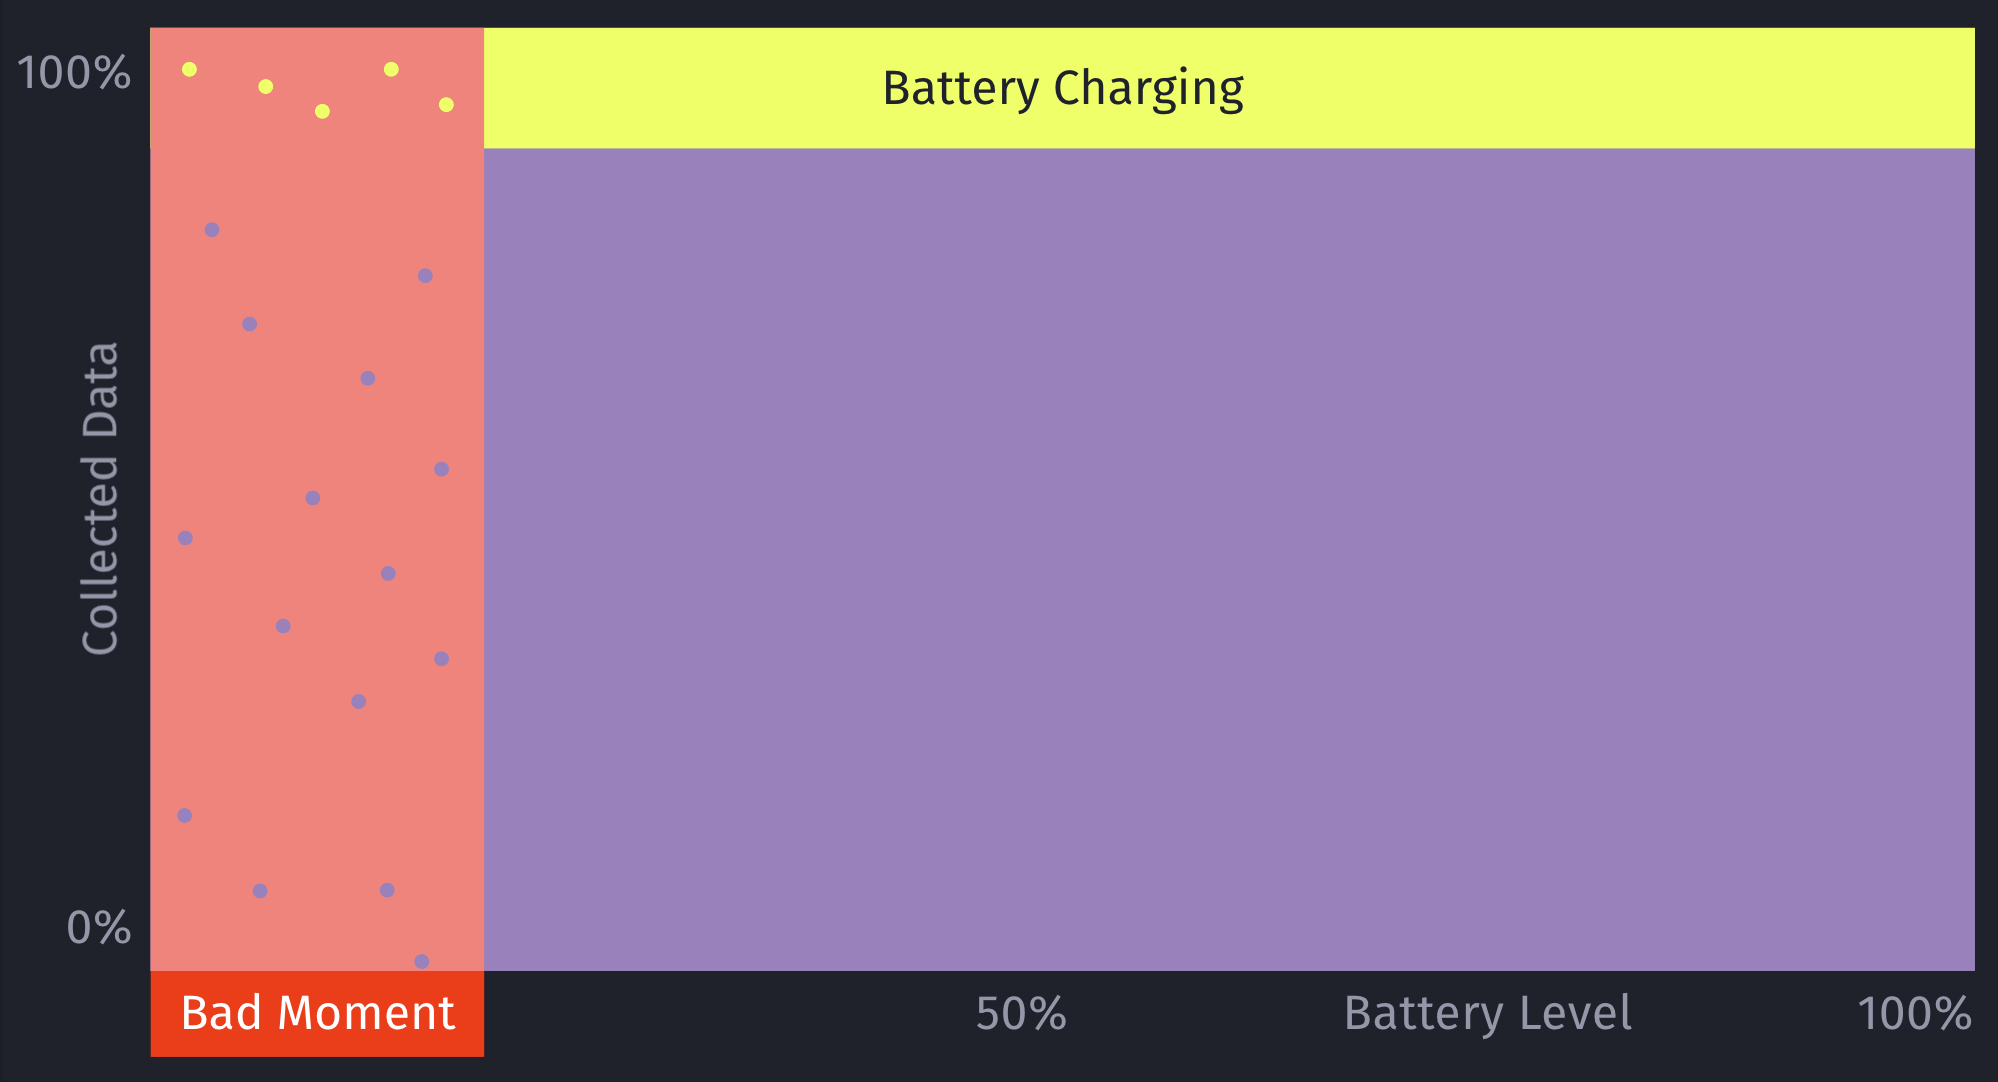
How to solve data blindness?
The only way to get additional, real-world data for those blind spots is to still sometimes decide to show a certain prompt even if the ML model deems it to be a bad moment to do so. This should be optimized to a small enough percentage that it doesn’t meaningfully reduce your conversion rates, but at the same time enough that you’ll get meaningful, real-world data to train and improve your machine learning model over time. Once we train the initial ML model, we look into the absolute numbers of prompts & sales, and determine an individual value for what the percentage should be.
Additionally, by introducing this concept of still randomly showing a prompt even if the model deems it to be a bad moment, it can help to prevent situations where a user may never see a prompt, due to the rules of the model. For example, a model may learn that there are hardly any sales in a certain region, and therefore decide to always skip showing prompts.
This is something we prevent on multiple levels for ContextSDK, and this one is the very last resort (on-device) to be sure this won’t happen. We continuously analyze, and evaluate our final model weights, as well as the incoming upsell data, to ensure our models leverage enough different types of signals.
let hasInvalidResult = upsellProbability == -1
let coreMLUpsellResult = (upsellProbability >= executionInformation.upsellThreshold || hasInvalidResult)

// In order to prevent cases where users never see an upsell this allows us to still show an upsell even if the model thinks it's a bad time.
let randomUpsellResult = Double.random(in: 0...1) < executionInformation.randomUpsellChance

let upsellResult = (coreMLUpsellResult || randomUpsellResult) ? UpsellResult.shouldUpsell : .shouldSkip

// We track if this prompt was shown as part of our random upsells, this way we can track performance.
modelBasedSignals.append(SignalBool(id: .wasRandomUpsell, value: randomUpsellResult && !coreMLUpsellResult))
As an additional layer, we also have a control group (with varying sizes) that we generate and use locally.
How to compare your model’s performance with the baseline
We’re working with a customer who’s currently aggressively pushing prompts onto users. They learned that those prompts lead to churn in their user-base, so their number one goal was to reduce the number of prompts, while keeping as much of the sales as possible.
We decided for a 50/50 split for their user-base to have two large enough buckets to evaluate the model’s performance
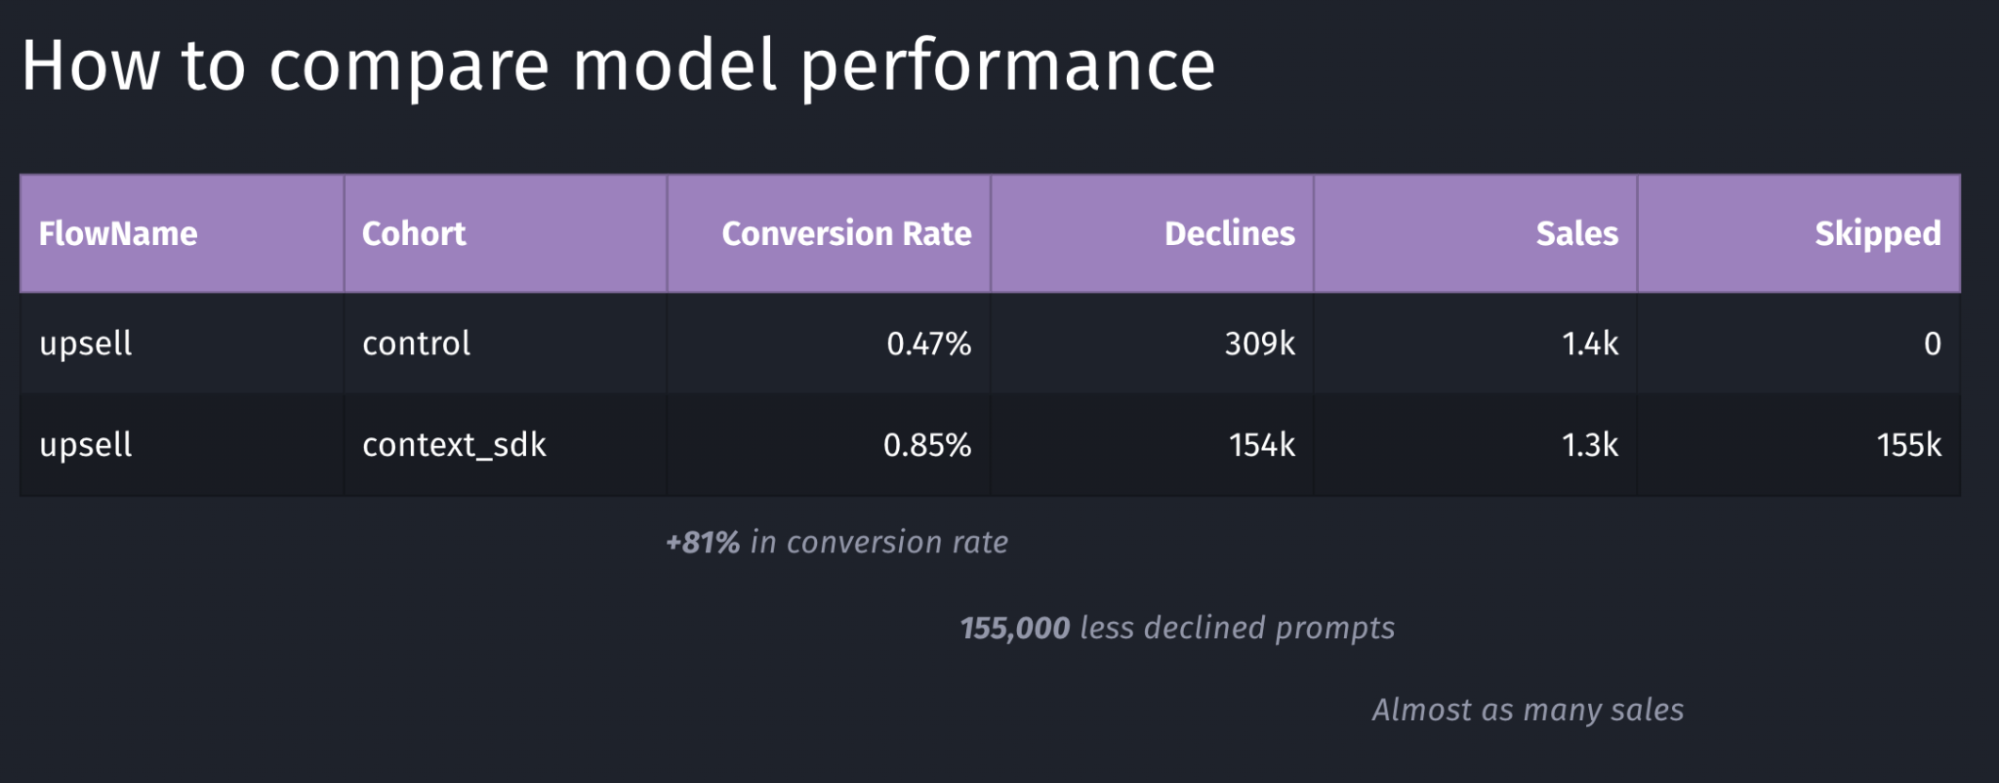
Depending on the goal of your model, you may want to target other key metrics to evaluate the performance of your model. In the table above, the main metric we looked for was the conversion rate, which in this case has a performance of +81%.
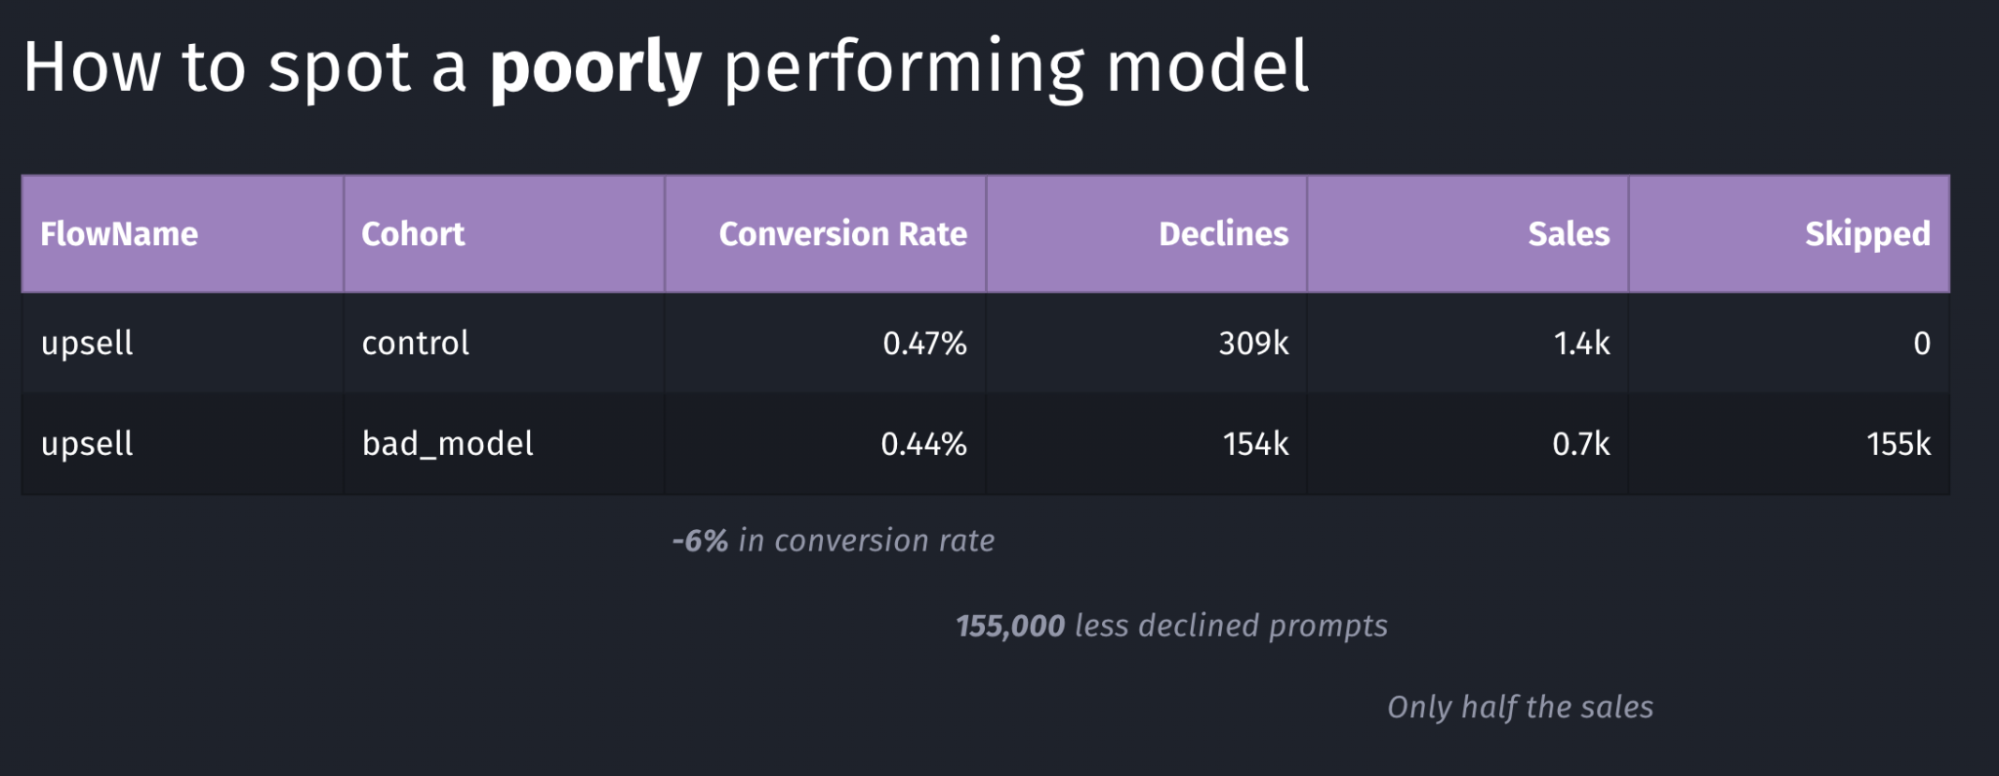
Above is an example of a model with poor performance: the conversion rate went down by 6% and the total number of sales dropped in half. Again, in our case we were looking for an increase in conversion rate, where in this case this goal is clearly not achieved.
Our systems continuously monitor whatever key metric we want to push (usually sales or conversion rate, depending on the client’s preference). As soon as a meaningful number of sales were made for both buckets, the performance is compared, and if it doesn’t meet our desired outcomes, the rollout will immediately be stopped, and rolled back, thanks to the over-the-air update system described in this article
Conclusion
In this article we’ve learned about the complexity of deploying machine learning models, and measuring and comparing their performance. It’s imperative to continuously monitor how well a model is working, and have automatic safeguards and corrections in place.
Overall, Apple has built excellent machine learning tools around CoreML, which have been built into iOS for many years, making it easy to build intelligent, offline-first mobile apps that nicely blend into the user’s real-world environment.
Tags: ios, context, sdk, swift, coreml, machine learning, sklearn, mlmodel, ota, over-the-air, remote, update, monitor, blind-spots | Edit on GitHub