Felix Krause
Co-Founder of contextsdk.com
Founder of fastlane.tools

While I leverage AI for my work, all my blog posts are handcrafted.
Writing automated tests for your documentation
The 2 favourite topics of every engineer are usually unit tests and documentation. The last few weeks I’ve put some thoughts in how to combine those two things for the ultimate developer joy.
Why should I write tests for my documentation?
- You might forget to update parts of the documentation when you update your API or interface
- Spelling mistakes happen in code samples
- You want to make sure you don’t introduce any regressions with a new release
With the launch of the new docs.fastlane.tools website, we took the time to set up a proper documentation system based on markdown files, converted to a static HTML page using MkDocs. By having full control over the generated HTML code, and going 100% open source on GitHub, you can do powerful things:
- Fail the build when a page got removed from the index using danger (see Dangerfile)
- Generate redirects when a page got moved (see generate_redirects.rb and available_redirects.rb)
- Make sure the repo is in a valid states, and all documentation follows the convention
- Write tests for your documentation
Tests for documentation, what does this even mean?
Just like with your actual code base, you want to be sure that your repository is in a valid state. The same applies for your documentation. Is your latest documentation up to date, and does it work as expected? Does it work with your latest release?
The first time I thought about running tests for documentation I thought only about the code samples. However you can write tests for a lot of more things. For example you want to ensure that all your assets are in the right sub-directory, that all referenced images and markdown files are available and follow your naming scheme.
Some examples of what you can do:
Validate file names
Ensure that all file names follow your convention - this is especially important if the file names are visible in the URL.
private_lane :ensure_filenames do
  UI.message "🕗  Making sure file names are all lowercase..."
  Dir["docs/**/*.md"].each do |current_file|
    if current_file =~ /[A-Z]/
      UI.user_error!(".md files must not be upper case, use a dash instead (file '#{current_file}')")
    end
  end
  UI.success "✅  All doc files are properly named to not be camel case"
end
Ensure every page has a header
fastlane docs require a title on each page to be consistent.
private_lane :ensure_headers do
  UI.message "🕗  Investigating all docs files and their headers..."
  exceptions = ["docs/index.md"]

  Dir["docs/**/*.md"].each do |current_file|
    next if exceptions.include?(current_file)
    unless File.read(current_file).start_with?("#"))
      UI.user_error!("File '#{current_file}' doesn't start with #"
    end
  end
  UI.success "✅  All doc files start with a header"
end
Ensure all image assets are available and in the correct folder
Automatically verify all referenced image assets are available and stored in the right folder, find the source here.
Ensure spelling of certain words
Recently we switched from fastlane to fastlane in markdown files, so we want to ensure all new docs use the new way of spelling.
private_lane :ensure_tool_name_formatting do
  UI.message "🕗  Verifying tool name formatting..."
  require 'fastlane/tools'

  Dir["docs/**/*.md"].each do |path|
    content = File.read(path)
    Fastlane::TOOLS.each do |tool|
      if content.include?("`#{tool}`")
        UI.user_error!("Use _#{tool}_ instead of `#{tool}` to mention a tool in the docs in '#{path}'")
      end

      if content.include?("_#{tool.to_s.capitalize}_") || content.include?("`#{tool.to_s.capitalize}`")
        UI.user_error!("fastlane tools have to be formatted in lower case: #{tool} in '#{path}'")
      end
    end
  end
  UI.success "✅  fastlane formatting is correct"
end
Verify code samples
How many times have you copied a code sample to try it out, just to find out it doesn’t work with the latest release? There are various reasons for this, and without tests there is almost no way to avoid this. The error can be as simple as a spelling mistake.
By having full control over your documentation, you can easily iterate over all your code samples, and make sure they work as expected.
For fastlane we found 28 errors just in the actions documentation, most commonly syntax errors or just simple spelling mistakes in parameter names.
For all the checks mentioned below, the source is on the fastlane docs repo.
Catch syntax errors in code samples
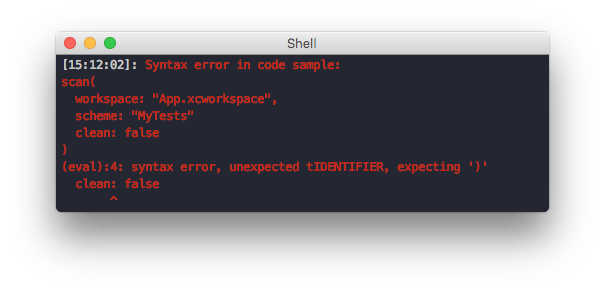
Nothing is more frustrating than copying a code sample and having to fix the syntax to make it work. Most users won’t spend the time to look into how they can contribute to your docs to fix the error.
Catch unavailable actions or methods
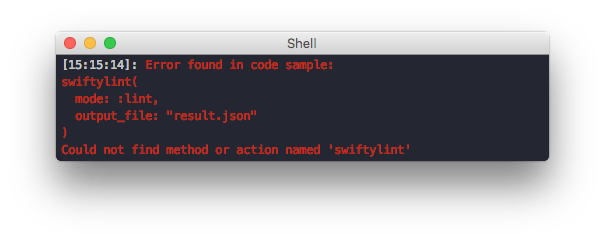
For fastlane most code samples call certain actions or integrations. Using tests we ensure that this action is available and correctly spelled.
Verify action parameters
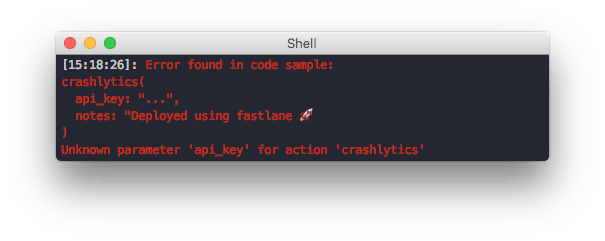
Most fastlane actions allow passing of named parameters. We now automatically verify that all parameters are available to use.
Verify parameter types
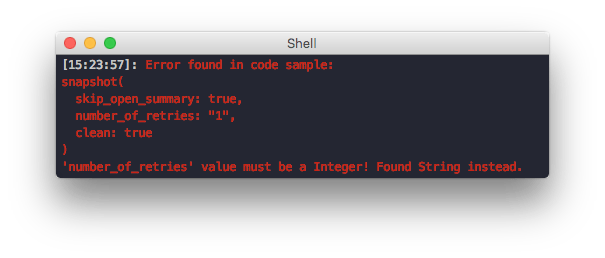
Every fastlane parameter has a type defined, which fastlane validates on run-time. It’s easy to get a type wrong in the documentation, so we now validate those too.
When to run tests for your docs?
There are 2 points where you want to verify your docs are valid and up to date:
- When you push a new release of your software (deploy script of your software)
- When you update your documentation (CI test script of your docs)
So whatever introduced a regression, the build will be failing and you can’t merge the change into master.
Where to go next
These are just some things you can do with tests for your documentation, however I’m sure there are so many things you can automatically test and verify every time your code changes. Let me know if you have any ideas on what other crazy things you can do.
Tags: fastlane, tests, automated, docs | Edit on GitHub
'trainer' - the simplest way to generate a JUnit report of your iOS tests
If you’re running tests for your iOS code base on some kind of Continuous Integration, you usually have to generate a JUnit file to report the test results, including error information, to your CI system. Until now, the easiest solution was to use the amazing xcpretty, which parses the xcodebuild output and converts it to something more readable, additionally to generating the JUnit report.
Since there were some difficulties with the new Xcode 8, Peter Steinberger and me had the idea to parse the test results the same way Xcode server does it: using the Xcode plist logs.
trainer is a simple standalone tool (that also contains a fastlane plugin), which does exactly that: Convert the plist files to JUnit reports.
By using trainer, the Twitter iOS code base now generates JUnit reports 10 times faster.
To start using trainer, just add the following to your Fastfile:
lane :test do
  scan(scheme: "ThemojiUITests",
       output_types: "",
       fail_build: false)

  trainer(output_directory: ".")
end
By combining trainer with danger, you can automatically show the failed tests right in your pull request, without having to open the actual output.
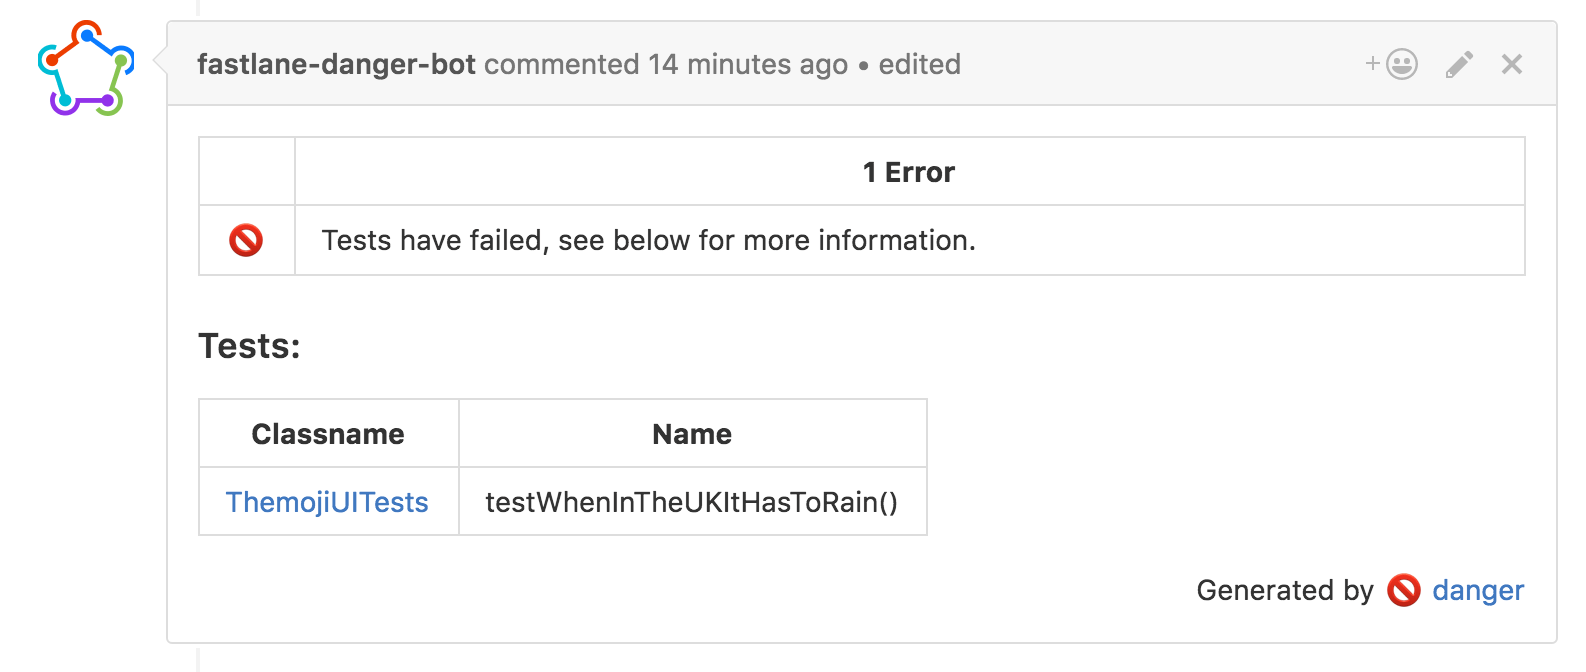
For more information about when to use trainer, check out the full blog article on PSPDFKit.
Introducing fastlane device grid, one-click installation, 2FA, more APK management features, and emoji deployment
In May, we focused on making pull requests more powerful and introduced enhanced deployment options. For more details, check out the full blog post on fabric.io/blog.
fastlane device grid
Tired of locally compiling your app just to test and preview a change? From now on, you can test your app straight on GitHub from the pull request using device grid.
One-click installation via the Fabric Mac app
Want to install fastlane with one quick click? You can do it directly from the Fabric Mac app.
Two-step verification
Looking to take advantage of two-step verification for stronger security? All fastlane tools now support two factor authentication.
APK expansion file upload and APK promote to track capability
Last but not least, thanks to awesome contributions from the community, it’s easier than ever to upload APK expansion files and promote existing beta builds to production on Google Play.
Some real innovation happening here: You can now use the 🚀 emoji to trigger fastlane pic.twitter.com/GUfz9WXU4l
— Felix Krause (@KrauseFx) May 4, 2016
Read the full blog post on fabric.io/blog
Be a 10x Mac user by using custom shortcuts for every application you use
One of the most common activities when using a computer is switching between apps and their windows. Unfortunately macOS is optimised for casual computer users (Mission Control, using the mouse, etc.).
2026 Update: While this post originally described my setup using BetterTouchTool, I’ve since switched to Raycast for managing my application shortcuts. See the update at the bottom for details on my current setup.
Using the dock

This approach requires the mouse and wastes either screen space, or has a slow animation when using auto-hide.
Using CMD + Tab

This approach is keyboard based, however the order of the application is sorted by most recently used, which is only nice to quickly switch between 2 applications.
Additionally this technique doesn’t allow you to launch a new application, but only switch between running ones.
Using Spotlight or Alfred

Great to quickly launch any application, however it’s not as fast as other approaches, as it requires you to type in multiple letters.
New: Launch every application using a shortcut
When people watch me use my computer I get asked a lot how I can switch between my applications so quickly.
I’m not kidding, I have a custom keyboard shortcut for every single application I use frequently.
This way I can always switch to any application just using one keyboard shortcut.
I use the excellent tool called BetterTouchTool, which was originally built to use custom gestures for the trackpad and mouse, however I use it mostly for my shortcuts.
Using BetterTouchTool, it will either switch to a running application or launch it otherwise.
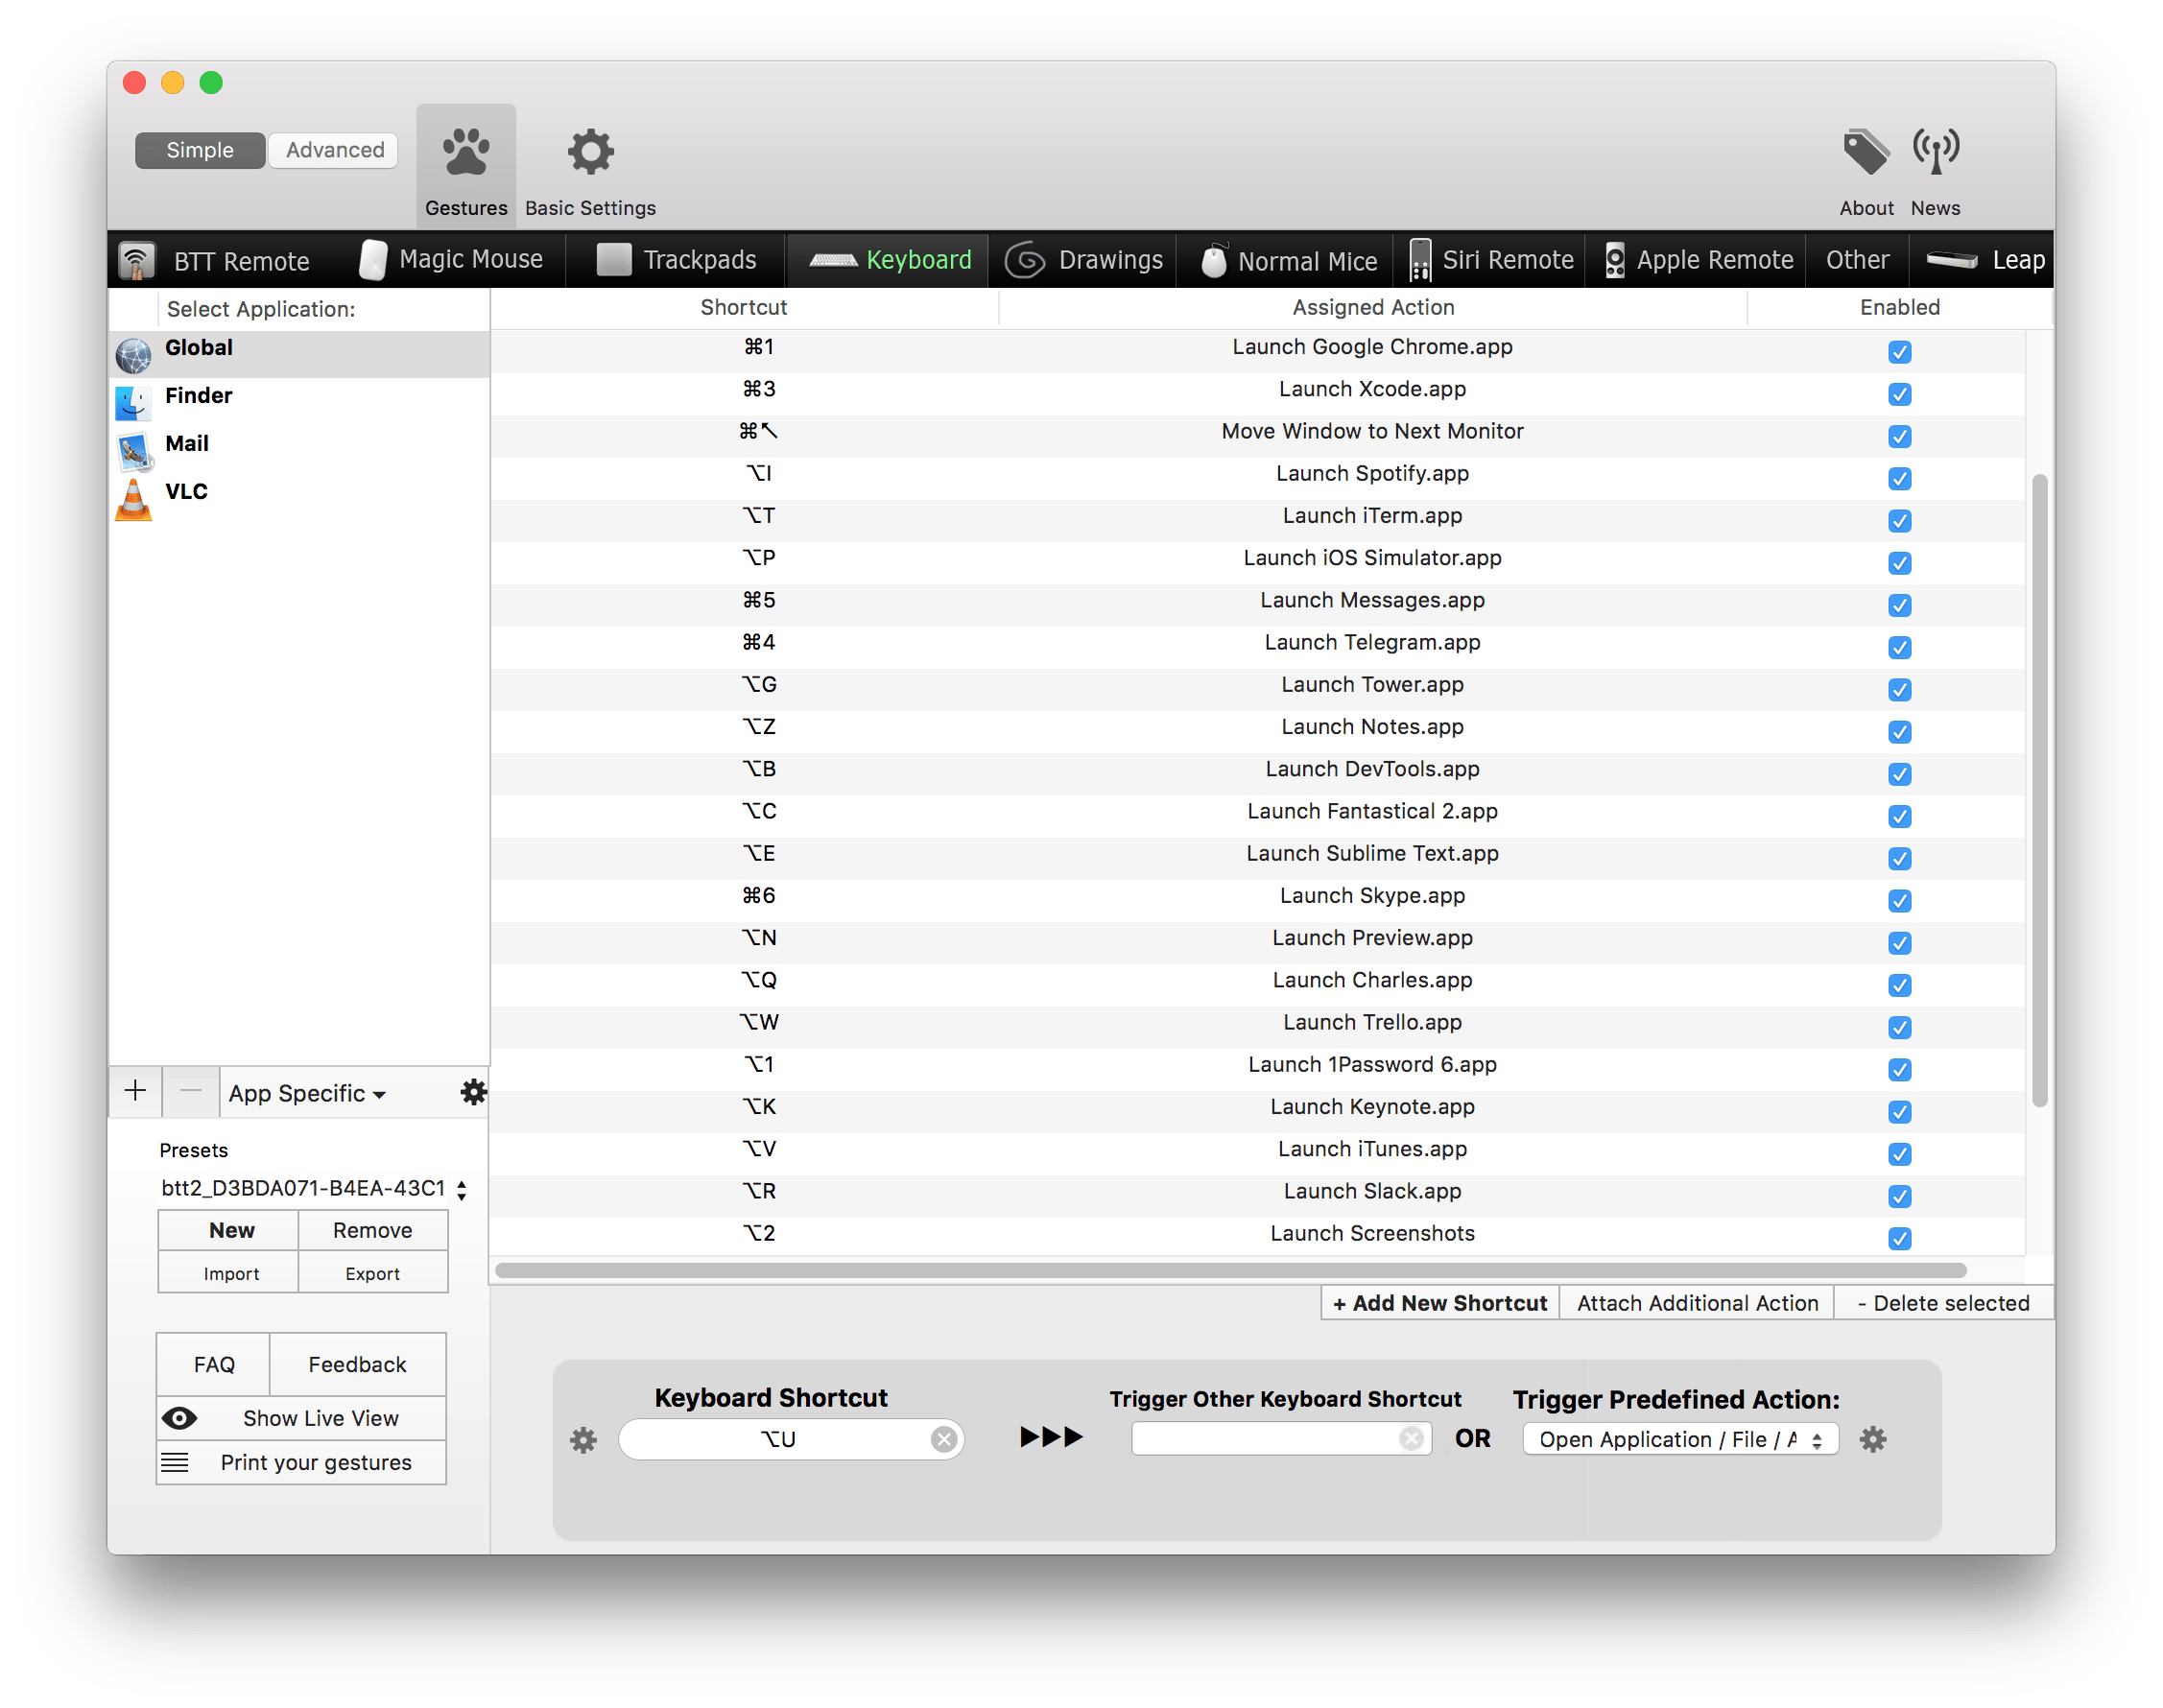
Some tricks:
- ALT + [letter]: Open a specific application (e.g. ALT + n launches Notes)
- Alt + 2: Open the screenshots directory (use this for any directory you use often)
- Ctrl + CMD + Arrow: Move window to next monitor
For even faster switches, change the BTT trigger to use "Trigger on Key Down".
2026 Update: Using Raycast
Nowadays I’m a heavy user of Raycast. I’ve migrated all my custom shortcuts to Raycast directly, which has the added benefit of helping me learn and remember the shortcuts better. Raycast shows the keyboard shortcut right inline with each command.
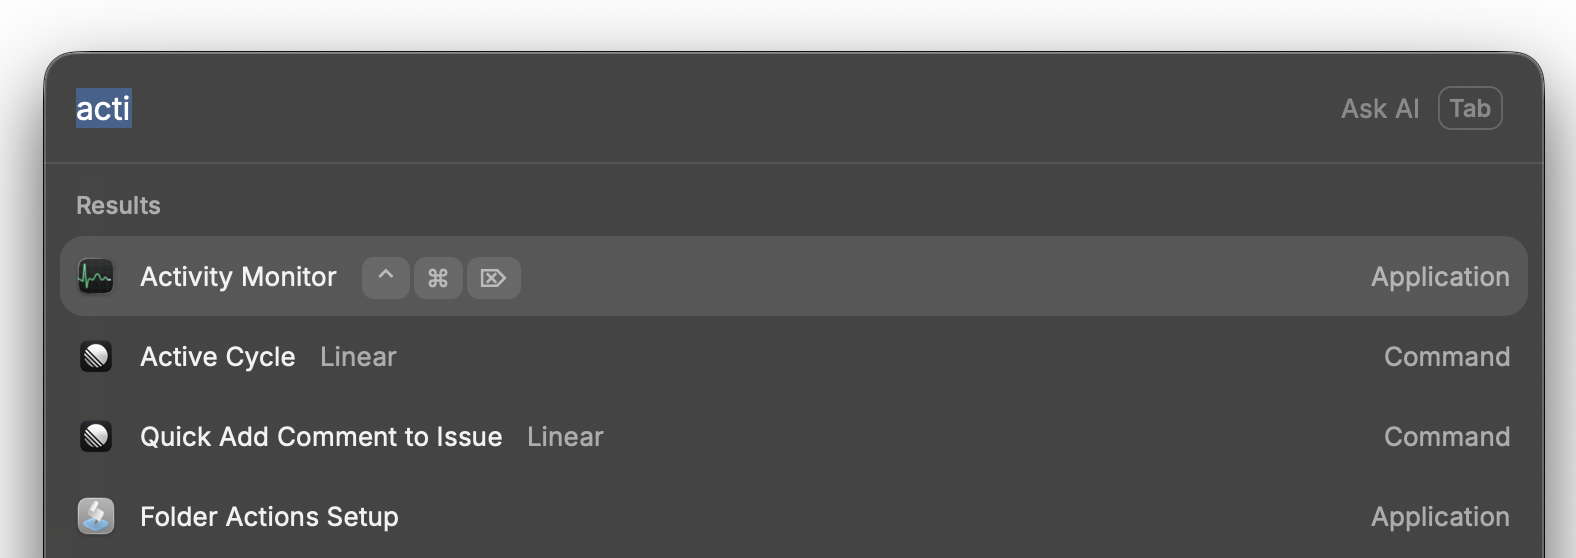
I also recently added a shortcut for Ctrl + Alt + Del to open Activity Monitor - easy to use from very old muscle memory.